A simple landscape drawing can be a useful starting point for a geography discussion. It does not need to resemble a named place or contain precise measurements. A river, a valley and a hill provide enough material for learners to practise describing what they can see, asking questions and separating an illustration from information that would need another source.
The activity below uses an invented scene drawn specifically for the lesson. Its aim is visual explanation, not the simulation of a real landscape. The teacher controls the vocabulary and the questions, while learners help decide which details belong in each frame of a short storyboard.
Begin with a small drawing brief
Give the scene a clear purpose before drawing. For example: “Help a viewer identify the river, the surrounding valley and the hill, then ask how we might investigate this place.” This keeps the picture manageable and prevents decorative detail from becoming the main task.
Draw a river as a curved blue line, a valley as the surrounding lower area and a hill as a rounded rise beside it. Add a small group of trees or a path only if those features help the discussion. Leave enough open space for labels. Use your own drawing, with a note that the scene is invented.
Do not assign distances, elevations or flow rates unless they are deliberately fictional numbers used for a separate exercise. Even then, label them as invented. A perspective sketch has no automatic scale. Its appearance should not be mistaken for surveyed data, a map projection or an actual satellite image.
Choose what learners should notice
Ask learners to look at the unlabelled picture first. What features can they name? Which words describe position? What is easy to see, and what is unclear? Write their answers in a list before adding labels. That discussion can reveal where the drawing needs a clearer shape or a less crowded arrangement.
Keep observation and interpretation in separate columns. “The river curves across the drawing” describes the picture. “The river must flood every year” adds a claim that the drawing does not establish. The distinction is useful without turning the activity into a test of who can guess the most.
Invite questions that point towards further investigation. What would a map tell us that the sketch does not? What information would help describe the slope? What records would be needed to discuss changes over time? Learners can identify the kind of information they need without inventing answers for the fictional place.
Plan a four-frame explanation
Divide a sheet into four boxes. In the first, show the complete landscape. In the second, isolate the river and its immediate surroundings. In the third, bring the valley and hill into focus. In the fourth, return to the whole scene with one investigation question.
Write one sentence below each box. “Here is our invented landscape” introduces the activity. “Follow the river across the drawing” directs attention. “Compare the valley area with the hill” establishes a relationship to discuss. “What other information would help us understand the land?” gives the ending a purpose.
These sentences are instructions for looking, not explanations of a physical process. If the lesson later examines erosion, rainfall or land use, introduce appropriate teaching sources separately. The storyboard can provide a shared visual prompt without being asked to prove how a landscape formed.
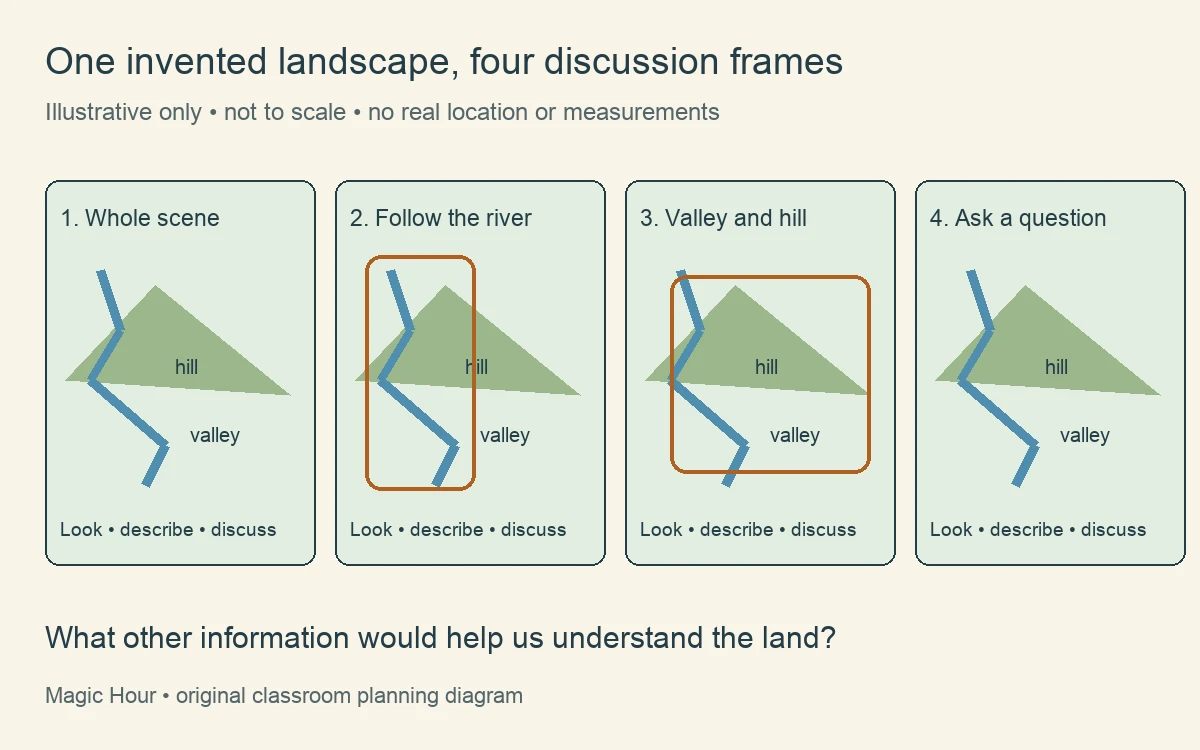
An original four-frame storyboard moves from an invented river-valley-hill scene to separate feature views, then returns to the full drawing with an investigation question. The diagram is illustrative and not to scale.
Use labels as part of the activity
Decide whether learners will add the labels themselves or receive a labelled version. Both approaches have a practical role. An unlabelled drawing invites description; a labelled one provides a reference while learners organise the explanation. Keep a copy of each so that the activity can move between the two.
Place labels close enough to identify their features without covering them. A line from the word to the relevant part of the drawing can be clearer than colour alone. If colour distinguishes the river, valley and hill, include words or shapes as well, so the explanation does not depend entirely on seeing a particular shade.
Read the labels and captions at the size in which learners will view them. A worksheet, classroom display and phone screen present different constraints. Where a label becomes crowded, simplify the drawing or move the explanation outside the frame rather than squeezing in more text.
A teacher can create a short sequence from the four frames by choosing their order and timing. The complete landscape appears first, followed by each feature view. Captions can stay visible while learners discuss the picture. A pause between frames may be more useful than a continuous animation.
This approach keeps the explanatory decisions visible. The author chooses which part of the drawing appears next and can change that choice if the discussion needs another order. A gentle transition or pointer can guide attention without suggesting that the land itself is physically changing.
Keep the still storyboard available alongside the sequence. Learners may want to compare two frames, reread a caption or describe a feature at their own pace. The motion version is an additional presentation of the lesson material rather than the only route through it.
Give generated motion a different task
An optional creative extension is to explore how the original drawing might look as a short moving illustration. an image-to-video workflow can be used to develop that separate interpretation from an owned image. Introduce it as a generated visual exercise, with the unchanged source drawing beside it.
Ask learners to compare the two versions. Which details remain recognisable? Which details have been added or altered? Does the moving illustration change the viewer’s impression of scale or direction? These are questions about the presentation, not observations about a real river or a measured environmental process.
Do not use generated water movement to demonstrate an actual flow rate, flood event or prediction. Keep the label explicit: “Generated interpretation of an invented landscape drawing.” If a clip obscures the original features, use it as an example of why an attractive visual may be unsuitable for a particular explanation, or leave it out.
End with a useful next question
Ask each learner to choose one question that the drawing cannot answer. They can then identify a source category that might help: a map, a field observation, a photograph or an appropriate record. No real location is required to practise matching a question with a source.
Save the drawing, storyboard and question list together. The result is a small teaching package with a clear purpose: describe the visible features, plan their explanation and recognise what further information would be needed. The simplicity of the scene leaves room for the learners’ questions to do the interesting work.
Use a fictional narrator to introduce the drawing
A synthetic presenter can introduce the landscape questions with Magic Hour lip sync AI, which matches mouth movements to a narration track. Use permitted presenter footage and audio, inspect timing throughout, and label synthetic scenes. Keep factual geography claims in checked text; the presenter explains the exercise rather than authenticating the invented landscape.
Separate a text-led visual concept from the reference drawing
A creator can also explore a new scene from a written description with Magic Hour AI video generator. Review the entire output for unexpected additions, label it as a generated concept, and keep it separate from the original landscape drawing. A plausible scene does not establish geographical facts or changes in the real world.
Contributor note: Prepared by Magic Hour using AI assistance. Submitted for publisher editorial review; review and approval are not claimed. Magic Hour provides creative image and video tools.