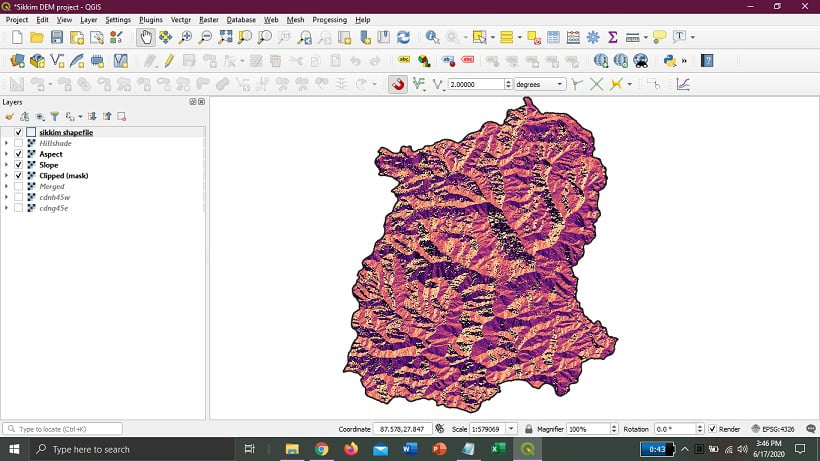
A Digital Elevation Model (DEM) may be a specialized database that represents the relief of a surface between points of known elevation.
In this article, we will learn so many things about Dem and Terrain analysis. We will first learn step by step the Dem file download process from bhuvan.nrsc.gov.in
After that, we will learn step-by-step preparation of Slope, Aspect, and Hillshade from the Dem file that we downloaded.
Try to download all files from the mentioned website and prepare a shapefile. You can also directly download files from this page. The link is available below.
We decide to make videos on this to guide you as much as we can from our end.
All videos link will be added to this article later.
If you want to learn What is Dem, Slope, Aspect, and Hillshade click here
Download the Dem file from Bhuvan.nrsc.gov.in :
Open bhuvan.nrsc.gov.in in the browser ⮕ open Data Archive ⮕ Select Category (Satellite/Sensor) ⮕ Select Sub Category (Cartosat -1) ⮕ Select Products (cartoDEM version-3 R1) ⮕ Select area ( click on Tiles) ⮕ Start ⮕ Select tiles from the map (as many as you need) [ press and hold Ctrl and click on tiles if you want to select multiple tiles]** ⮕ click on Next ⮕ Click on the download button of the respective file that shows on-screen [*need to sign in ] ⮕ Select Folder and give Filename ⮕ now click on save button. [File will be Downloaded]
Prepare Clipped(mask) with Dem file and Shapefile :
** We download the DEM file of Sikkim State and also prepare a shapefile of Sikkim State. (Practice purpose)
Open the QGIS application ⮕ add raster layer (add tif file from the folder which we download from Bhuvan) ⮕ open properties of tif file ⮕ Symbology ⮕ Single-band pseudocolour ⮕ apply ⮕ ok.
Merge tif file if you download multiple tif files.
Click on Raster from the menu bar ⮕ Miscellaneous ⮕ Merge ⮕ Input Layer ⮕ click on three dots (…) ⮕ Select all tif files ⮕ ok. [you can skip all options or save the file permanently] ⮕ Run.
now add the vector file of Sikkim State [you can download the shapefile from here] ⮕ click on Raster from the menu bar ⮕ Extraction ⮕ Clip Raster by Mask Layer ⮕ Input Layer (merged tif file) ⮕ Mask Layer (select shapefile) ⮕ Run ⮕ close.
** new layer will be added clipped(mask) ⮕ Properties ⮕ Transparency ⮕ Set additional no data value ‘0‘ ⮕ apply to ⮕ click on Symbology ⮕ Single-band pseudocolour ⮕ select colour ram (which is suitable, we select Magma) ⮕ apply ⮕ ok.
Prepare Slope:
Click on Raster from the menu bar ⮕Analysis ⮕ Slope ⮕ Input layer (clipped mask) ⮕ Set Ratio of the vertical units ‘9999‘ ⮕ Run ⮕ close ⮕ open newly created Slope file properties ⮕ Transparency ⮕ Additional no data value ‘0‘ ⮕ apply ⮕ ok.
Prepare Aspect:
Click on Raster from the menu bar ⮕Analysis ⮕ Aspect ⮕ Input layer (clipped mask) ⮕ Tick on (Return trigonometric angle instead of azimuth ⮕ (save a file permanently or just leave all options) ⮕ Run ⮕ Close.
⮕ open newly created Aspect file properties ⮕ Symbology ⮕ Single-band ⮕ select colour ramp (we select spectral) ⮕ apply ⮕ ok.
Prepare Hillshade:
Click on Raster from the menu bar ⮕Analysis ⮕ Hillshade ⮕ Input layer (clipped mask) ⮕ (save a file permanently or just leave all options) ⮕ Run ⮕ Close.
⮕ open newly created Hillshade file properties ⮕ Symbology ⮕ Single-band ⮕ select colour ramp (we select magma) ⮕ apply ⮕ ok.
in the QGIS layer panel, move the Sikkim shapefile on Top ⮕ Symbol ⮕ Single symbol ⮕ Simple fill ⮕ Fill colour (Transparent) ⮕ Stoke width 0.66 ⮕ apply ⮕ ok.
Download the Sikkim DEM file: Click here
Download the Sikkim Shapefile: Click here
Dem (Slope, Aspect, Hillshade) full project Download (138Mb):
If you face any problem with any step, feels free to with us.


